Reading BRIM's meters, and when to turn the ceiling on
What the CLIPPED, PEAK, TP and RMS readings measure and where, what the three history views show, and what the ceiling holds, and does not, before a lossy encoder.
Three questions the face answers
BRIM's readings answer three different questions, and they are measured in three different places. How much came off the peaks is the CLIPPED number. What went in is the INPUT panel. What left is the OUTPUT panel, and only the output has a true peak reading, because that is the only signal anything downstream will ever see.
Getting them confused is the usual reason a setting looks wrong. The input meter does not move when you change GAIN, and that is by design.



What each reading measures
The INPUT meter, with its PEAK and RMS readings, measures the signal as it arrives, before the input GAIN fader. It tells you how hot the source is, not how hard you are driving BRIM. The line drawn across it marks where the clip level falls on that incoming signal, which is CLIP minus GAIN, so raising GAIN moves the line down instead of moving the meter up.
CLIPPED, in the HISTORY header, is how many dB the clipper took off the peaks. The REDUCTION strip under the history draws the same thing as a bar per channel on a scale from -12 to +12 dB with zero in the middle.
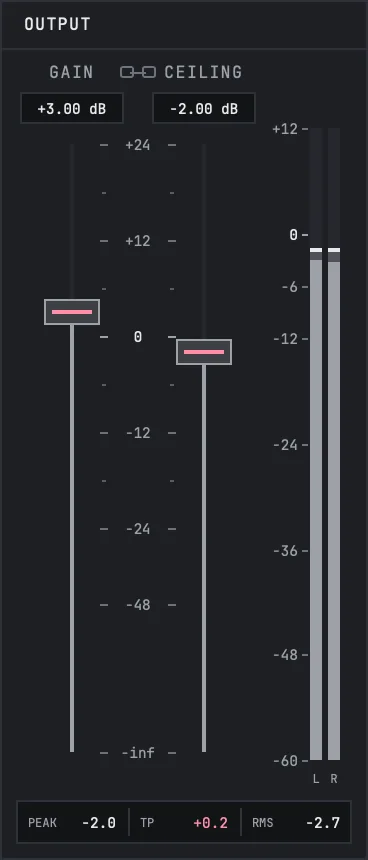
The OUTPUT meter reads after the output GAIN, after the ceiling and after the bypass, so it is what really leaves the plugin. PEAK is the highest sample, TP is the true peak, the highest point of the waveform between the samples once it is rebuilt, and RMS is the average level. The true peak is computed while the editor is open.
The meter bars run from +12 at the top to -60 at the bottom. Every reading holds its highest value until you click it; clicking any of them, or the CLIPPED number, clears the holds together.

Changing what the history draws
Choose the source
The first VIEW cell in the settings bar picks what the history draws. OUT AND CUT draws the output as a grey body with the amount cut off drawn in pink on top of it. INPUT draws the incoming signal. REDUCTION draws only the amount cut. Click the cell to move to the next one.
Choose the scale
The second cell switches between HALF, a one sided picture with silence at the bottom, and FULL, a two sided waveform with silence along the middle line.
Choose the speed
The third cell sets how much time fits across the panel: SLOW is 30 seconds, NORMAL 10 seconds and FAST 3 seconds.

Peaks with the ceiling off
With the ceiling off, BRIM's output can peak above the clip level. Clipping happens at the oversampled rate, and the filter that brings the signal back down rebuilds part of the cut edge, so a flat top comes out slightly higher: about +0.1 dB on a low sine, about +1 dB on a hard driven 6.7 kHz tone, and up to about +4 dB on dense drums. This is the normal behaviour of an oversampled clipper and it keeps the sound free of aliasing.
If the output must never pass a level, turn the ceiling on: it limits every output sample to the ceiling value. The ceiling limits samples, not the true peak between them, so leave a little headroom, for example -1 dB, before a lossy encoder.
Setting the ceiling
CEILING in the settings bar turns it on and off. Switching it, by hand or from automation, crossfades over 10 ms, so it does not click. The CEILING fader in the OUTPUT panel sets the value, from -inf to +24 dB, and opens at 0 dB.
The chain between GAIN and CEILING in the OUTPUT panel links the two faders: while it is on, moving one moves the other by the same number of dB, so the distance between them stays where you put it. The link is a habit of the editor, and your host's automation lanes move each parameter on its own.
When the ceiling is on and CLIP plus OUTPUT GAIN would put the clipped peaks above it, the settings bar shows ! CLIP > CEILING ! in amber. It means the ceiling, not the clipper, is now doing the cutting at the top. Lower OUTPUT GAIN or CLIP until the warning goes.


Questions this page answers
- The input meter reads before the input GAIN, so it does not move when you drive harder. Watch CLIPPED and the pink instead.
- TP can read above PEAK, and above the ceiling. The ceiling holds samples, not the waveform between them.
- With the ceiling off, a peak of a few tenths of a dB above the clip level is the oversampling filter, not a fault.
- For a master going to a streaming service, a ceiling around -1 dB leaves room for the encoder. The STREAMING SAFE preset uses -1.5 dB.
- ! CLIP > CEILING ! is a warning, not an error. The audio keeps playing; the ceiling is just doing more than you may intend.
- The link between OUTPUT GAIN and CEILING is an editor habit. Automation moves the two separately.
Still stuck?
Nothing here matching? Write to a person.